~/guides/UNSLOP.md
unslop: type /unslop in Claude Code to turn a purple, AI-looking UI into a designed one (audit, direction, nine passes)
Purple gradients, glows and emoji everywhere? The free unslop skill lists the AI tells, proposes a direction, and redesigns pass by pass once you agree.
Purple gradients, glows everywhere, an emoji on every label, a headline shouting with exclamation marks: you can tell an AI made it. unslop is a free skill by Damir Sokolovsky for Claude Code and Codex that fixes screens that are already built but look AI-made. This is the full version of the UNSLOP reel: the official before and after, the AI tells it looks for, how to install it (copy one folder), how to ask for it, what each of the nine passes changes, and what to know before you use it. Everything follows the official README and SKILL.md, checked on 12 November 2026.
01The result first: an AI-looking dashboard, after unslop

On the left is the "vibecoded" example in unslop's own repo: purple gradient background and buttons, a glowing search box and PRO badge, an emoji on every row, and the headline "Welcome back, Damir!". On the right is the author's finished version of the same screen: the features, data and section order are unchanged, the colours come down to one grey ramp and one accent, the emoji become line icons, and all the colour lives in one card and one chart.
- The AI tells unslop looks for (marked one by one on the official example).
- Install: the commands for Claude Code and for Codex, ready to copy.
- How to ask for /unslop: it shows you the problems and a direction first and edits only after you agree.
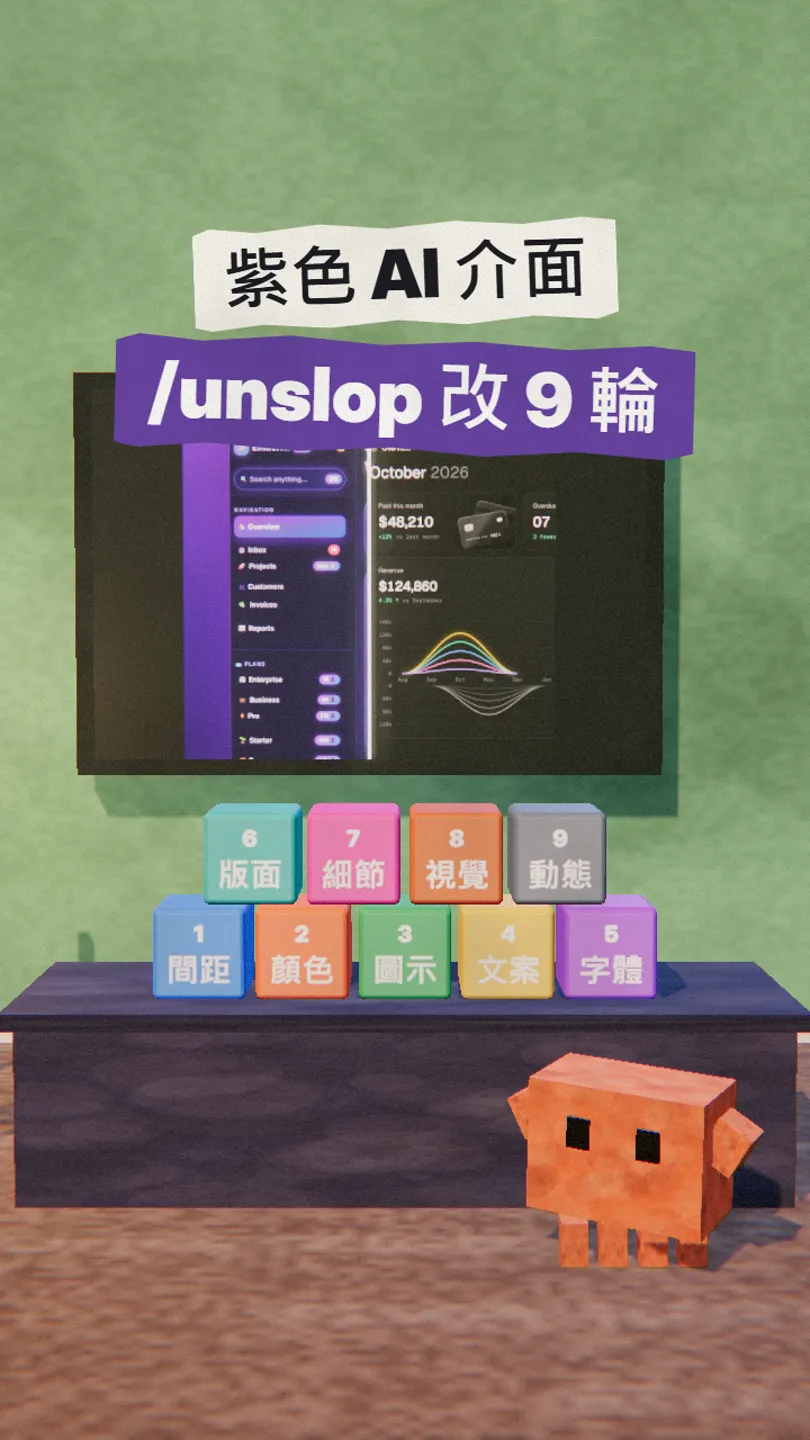
- What each of the nine passes changes, from spacing to motion.
- What to know first: the licence, the parts that can cost money, and when it tells you not to change anything.
02The AI tells it looks for
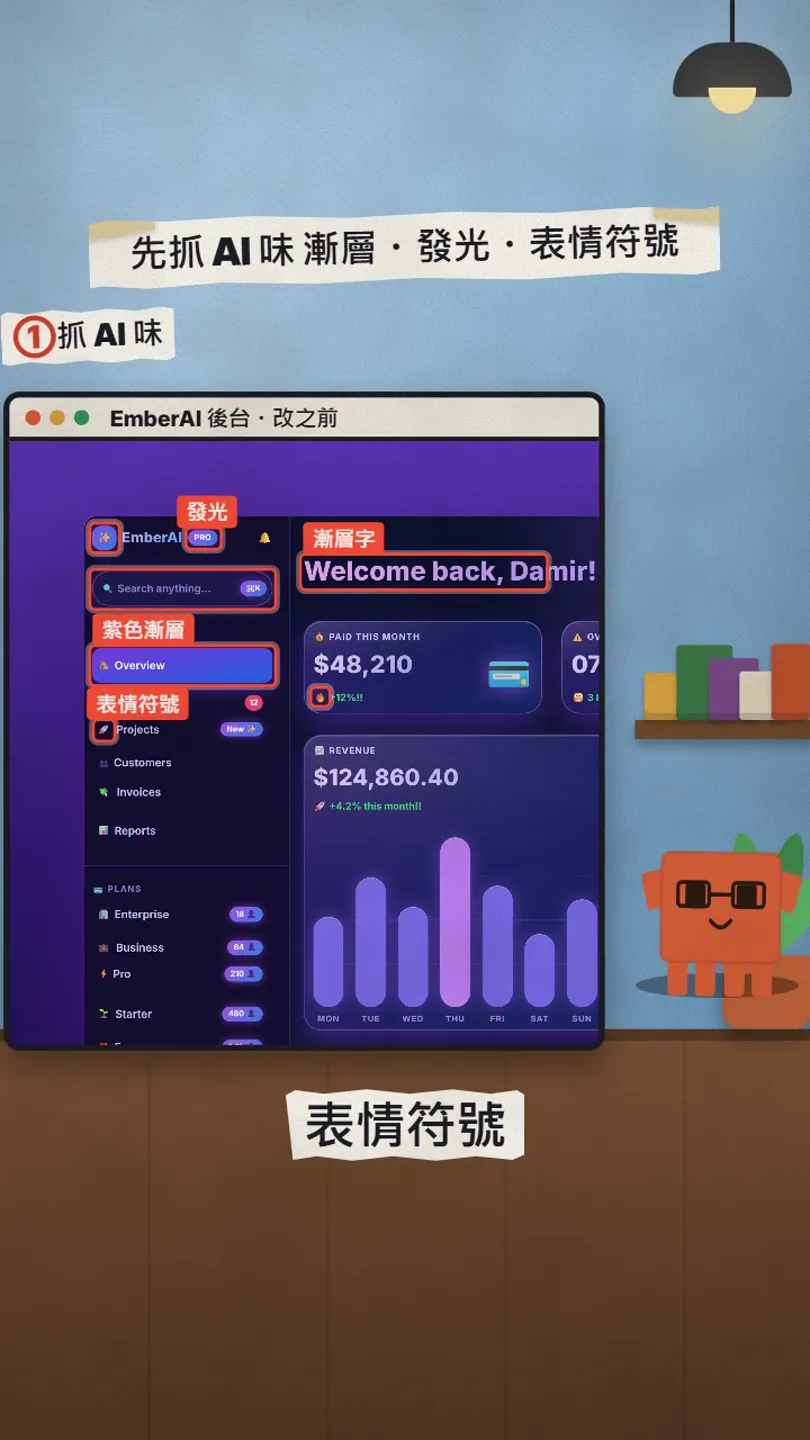
unslop starts with an audit: it goes through its list (references/signs.md) and writes down every sign of slop on the screen, one line each, with where it lives. The official list has groups for surfaces and colour, type, icons, spacing, copy, components, landing pages and visuals. Common ones:
- Purple-to-blue or violet-to-pink gradients on backgrounds, cards, buttons or the active menu item, and gradient text.
- Coloured glows and shadows, glowing pills, coloured washes behind the content.
- Emoji used as icons or in front of every label; a sparkle ✨ on anything AI.
- The heaviest weight for headings, uppercase labels with wide tracking (NAVIGATION, PAID THIS MONTH).
- Greeting headlines like "Welcome back, Damir! 👋", exclamation marks, changes like "+12%!!" that do not say what they compare to.
- Spacing typed at random (13px, 7px), sibling cards with different padding.
- Everything a full pill, PRO and New ✨ badges everywhere, rainbow bar charts.
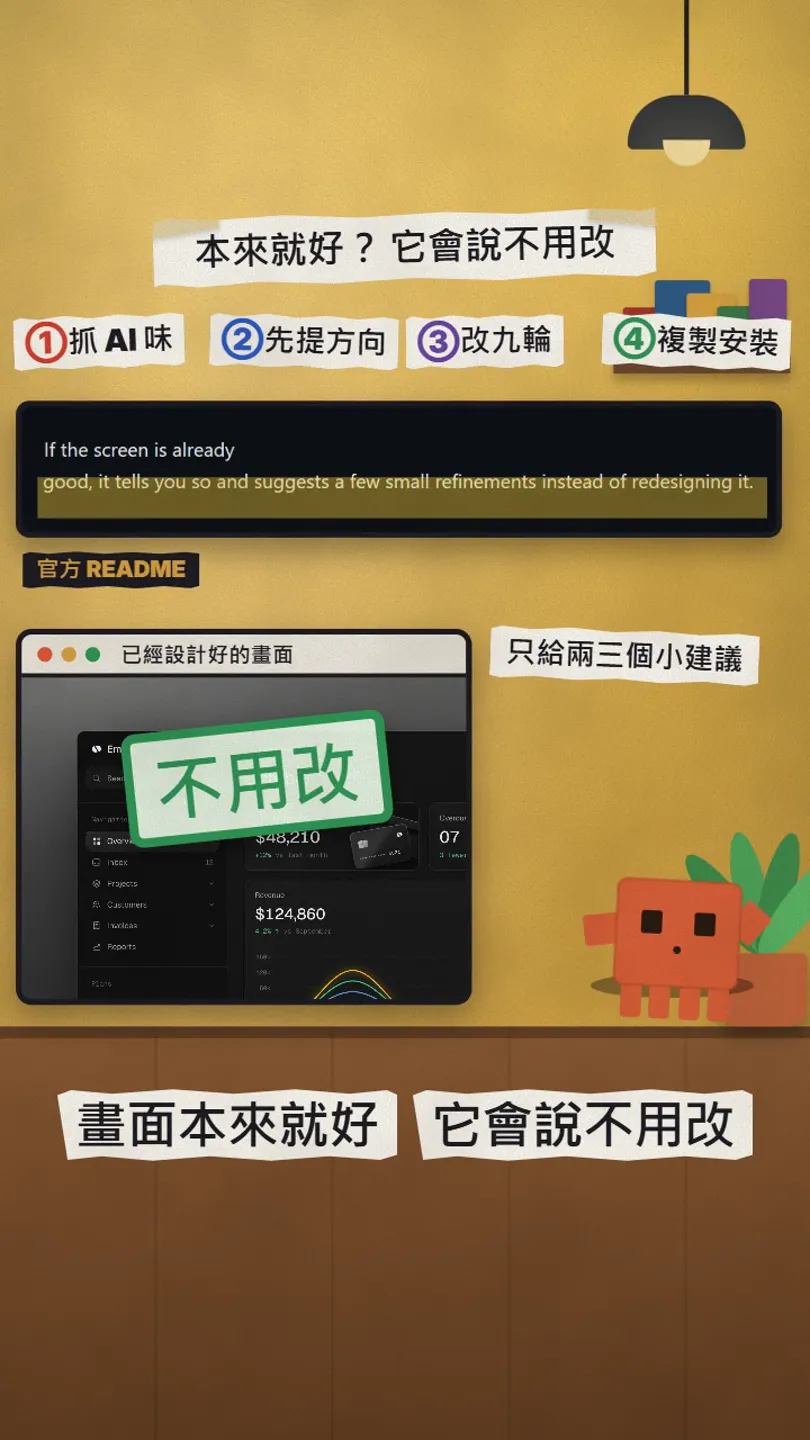
After the audit it decides how much to change: heavy slop gets the full process; a mostly designed screen with a few signs gets only those fixed, keeping its palette, type and layout; a screen with no slop gets told so, with two or three small refinements at most.
03Install: copy one folder
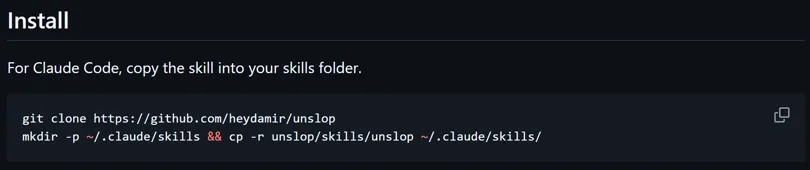
Claude Code: run these two lines in a terminal to copy the skill folder into your skills folder. For a single project, copy it into that project's .claude/skills/ instead.
git clone https://github.com/heydamir/unslop
mkdir -p ~/.claude/skills && cp -r unslop/skills/unslop ~/.claude/skills/
Codex: ask Codex to install it straight from the repo, or copy it by hand into ~/.agents/skills/ (.agents/skills/ for one project). The README also covers Google Antigravity.
$skill-installer install https://github.com/heydamir/unslop/tree/main/skills/unslop
04How to use it: type /unslop, look at the problems and the direction, then say yes
In Claude Code type /unslop followed by the screen you want fixed; in Codex type $unslop. You can also just ask in your own words and the agent picks the skill up. Replace the [ ] parts with your own:
/unslop this dashboard
/unslop [the page, e.g. app/dashboard/page.tsx]. Show me the audit and the design direction first, and only edit after I agree.
/unslop [page]. This page is mostly designed already: fix only what the audit finds and keep the existing colours, type and layout.
- It finds the files that render your screen and, when it can open them in a browser, takes a screenshot so it judges what people see, not only the code.
- It lists the audit: one line per sign of slop, with where it lives.
- It writes the five lines of the direction: what the product is, its character (two or three concrete words; clean, modern and sleek are not allowed), the world it belongs to, the one or two moments that get the colour, and one signature detail only your product would have.
- It stops and waits for your answer. If the direction is wrong, say so now; changing it later means redoing everything. (It skips this only if you said "just do it" at the start.)
- Once you agree, it runs the nine passes in order, checks the screen again and reports what changed.
05What each of the nine passes changes
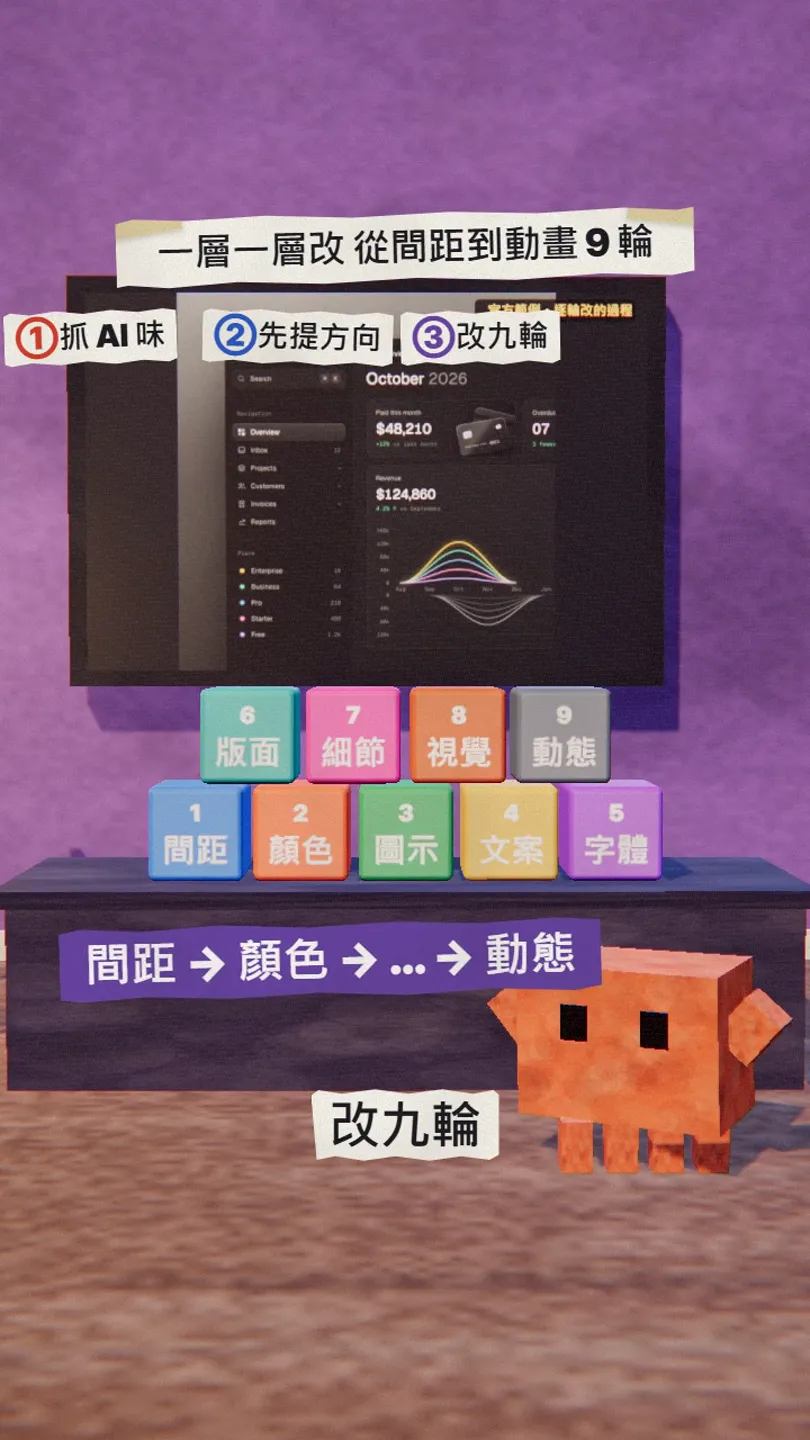
Each pass is finished across the whole screen before the next one starts. The order is on purpose: spacing first, because everything reads differently once the rhythm is right; copy before type and layout, because the headline's length decides its size and place; visuals and motion last, because they should fit a screen that already works without them.
- Spacing: everything on a 4px grid, equal things the same size, smaller gaps inside a group than between groups.
- Colour: one neutral ramp tinted toward the product's world, three text colours, one accent; gradients, glows and coloured shadows removed.
- Icons: every emoji becomes a line icon from one set, one size and one stroke.
- Copy: headlines say what the product does for whom; no exclamation marks, greeting headlines or hype words; changes say what they compare to.
- Type: a typeface chosen for the direction, weights 400 and 500, sentence-case labels, tabular figures.
- Layout: the sections and their order stay; dashboards keep real app proportions; landing heroes become an asymmetric split or a full scene.
- Details: nested radii that add up, counts as quiet text, one accent per chart, shortcuts as small keycaps.
- Visuals: glossy blobs and orbs go; the product itself is shown; only a landing hero needs a picture.
- Motion: looping, floating and pulsing animation goes; only motion that explains something stays, with one easing curve.
06Things to know
- The licence is CC BY 4.0: free to use, change and share, including commercially, as long as you credit Damir Sokolovsky (@heydamir) and link back to the repo. Keep the credit when you share or adapt the skill files; the short share video it makes also carries a small "unslop by @heydamir" credit.
- The before and after in the reel are the official example, not my run. The direction is written from your product, so everyone gets a different result, not one template.
- When a landing hero needs a picture, it can generate one through an image service you have connected; the README says it shows the prompt and asks before every paid generation. Dashboards and app screens rarely need one.
- It keeps your features, content and section order, and it never renames your product; what changes is sizes, colours, words and images.
- For a live site where you only have a link, it saves a copy of the page and works on that: what you get is redesigned code to hand to whoever runs the real site.
- The end of the README links to the author's paid service (he redesigns one screen in three days); the skill itself is free, and this guide is not sponsored.
- Check the result yourself afterwards: phone width, dark mode, button hover and keyboard focus.
Sources
What should the next reel cover?
I test Claude and AI tools every day and turn the useful ones into reels. Follow @vivianlin.tech to catch each new guide.